
So I follow a blog on Facebook called All Women Stalk and every Thursday is Thrifty Thursday. They post up all sorts of cool DIY things throughout the day. I believe it was the Thursday before my surgery I saw this post on how to make a Valentine's Wreath by The Thriftress. Of course I thought, oh, that's neat. What a clever idea.
I didn't really want one so I just pinned it to my Cool DIY Stuff board on Pinterest & went on my way. But then it was a day before my leg surgery & I could not go to sleep. As I lay there I had a brilliant idea at 1:30 in the morning.
My older cousin was having a baby soon. She is the extreme girly to my anti-girly and she was having a little girly. I just knew for sure that she'd end up with all sorts of girly hair do-dads & what not so my brilliant idea was born. I was inspired by the Valentine's Wreath, my cousin's girliness & a flower that all the girls in school used to draw. I decided I would make a flower out of paper towel tubes & then hang some ribbon from it to turn it into a hair clip holder!
Getting the concept from my head into reality was a bit harder than I expected. Mostly because I have not made any sort of craft or creation since I was probably in 6th grade? Junior High at the latest! But as I said in another post my Mom is the craftiest person that I know so my potential is in there somewhere!
One of the hardest things for me was the shopping trip to Michael's. I think I had been into Michael's once or twice with my Mom a loooong time ago but that was it. I was surrounded by all sorts of things that looked awesome but I had no idea what exactly they were for or how to make them work. I had no idea where to find most of what I needed & then when I did there were sooo many options! I finally managed to make my selections & with a bit of helpful advice from my Mom, I managed to create this.

Items needed:
4 paper towel tubes (more if you want a bigger flower)
Small piece of thin cardboard
Spray paint
Hot glue gun
Ribbon
Since I was unsure how it would look with the pieces I also saved a few toilet paper tubes & cut the pieces very thin to have a lot of pieces to try & get my shape right. You can do this as well if you're unsure.
.JPG)
.JPG)
.JPG)
.JPG)
I had a lot of very disappointing arrangements but once I thought I finally had the shape I wanted it was time to cut my tubes. I folded part of the tube in & smashed the whole thing flat.
Then I put my ruler next to it & drew a light mark every inch. Then I drew a light line & started to cut my pieces. Once they were all cut I used my fingers to try & make the shapes a bit more uniform & round out the corners.
To make sure I had enough pieces I arranged them all & I was so happy because I finally had the perfect shape that I wanted. The trick was rounding out the pieces.
.JPG)
.JPG)
Next step is to paint the pieces. To save time & paint you probably don't have to worry about getting the outside of the pieces so heavily coated since the way it will hang on the wall most of the outside pieces will be covered by other pieces & not visible. Just try to make sure you get the inside of the tubes coated pretty well because they are the most visible.
Once your pieces are coated to your satisfaction & dried you can start to glue them together. I once again arranged them into the pattern that I wanted & then spread the pieces out & slowly started to glue them together. I matched up each piece where I thought it should go before I took it & put the glue on.
I'm a major perfectionist & before I glued the last layer of petals on I was not exactly happy. The flower seemed slightly off balance so I messed around with the various options. I had it glued together this much

I was tempted to leave it at this stage but it looked more like a snow flake than a flower to me. I took pictures of the various options & asked my husband, my friends & my Mom for their opinions.
The 1st option left me with 2 pieces extra but it almost looked like they needed to go into the areas I circled in red. My Mom thought this one looked the best though.

This option had the 2 extra pieces filled in at the top

This is the one I was the most displeased with since the 2 extra pieces went onto the right side & then it looked like I needed 2 more on the left.

I eventually went with Option 1 & glued all the pieces together.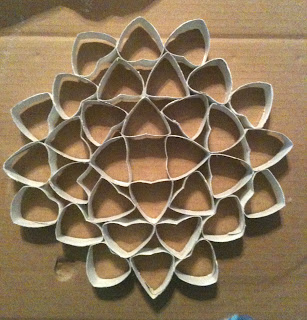
Now that I had it glued together it was time for the final coat & to get the center done. My Mom had been painting a basket a light pink to put our shower gifts in & we decided to do the final coat in pink. I had originally planned on a white flower with pink glitter but the glitter that I bought was so fine & since you don't see the large outside pieces of the flower much anyway the glitter wasn't all that visible. While the paint was still wet we went ahead & put some glitter on it anyway.

The night before I was to do the final coat we happened to use the last Diaper Genie refill so my husband was about to throw the box away when I realized it was exactly what I had been looking for. The cardboard was the perfect thickness that I wanted for the center of my flower & it was already coated in paint. I figured painting it yellow would be much easier than it was painting my tubes. I also noticed that the cap to the spray paint looked to be the perfect size circle that I wanted so we traced it onto the cardboard & cut it out. Then about 2 coats later & I had the center done.

All I had left to do was glue the circle onto the center of the flower. Once it dried I rolled out some of the ribbon I had bought until I had a length I was happy with & then I glued it to the back center of the flower. My ribbon had wire on each outside edge so I just folded up the tip to the back & then put my hair clips on it.
Because this was not only my creation but the spray painting took so long & was such a pain I told my cousin she better make sure she put it on her wall. I decided that I need a picture of it on her wall too so after the shower we put it up & I got my picture. As you can tell I'm very proud of my creation!
.JPG)
Because cardboard soaks up the paint so much I suggest you try to find some sort of primer to put on the cardboard before you spray it. I used almost an entire can of spray paint on my roughly 32 pieces. I am not sure if it would be easier to spray your tubes before cutting or after. I painted my pieces after I cut them. If you think you want to paint them prior to cutting just keep in mind that the paint makes the cardboard more stiff so it's not quite as easy to bend & shape.
My cousin requested more ribbon because she was out of space & still had more clips. I think it looks great like it is & even thought if I had realized it before I would have made the ribbon green because it looks like the stem of a flower. In order to add more ribbon to it I took the current ribbon off & cut another ribbon the same length & glued them on each side of the flower & then glued a longer piece to the center. Hopefully that gives her enough ribbon to hang all her clips on.
Here's a picture of the cute little observer I had during most of the super glue process.

Here's a picture of the cute little observer I had during most of the super glue process.

Awesome!! I love that we helped to inspire your creativity and this project! I love it!! Your little observer is so adorable!! xoxo
ReplyDelete